> For the complete documentation index, see [llms.txt](https://docs.intelligems.io/llms.txt). Markdown versions of documentation pages are available by appending `.md` to page URLs; this page is available as [Markdown](https://docs.intelligems.io/developer-resources/external-api/automations-and-guides/build-a-multi-client-test-overview-dashboard.md).
# Build a Multi-Client Test Overview Dashboard
A step-by-step guide to building your own cross-client testing dashboard.
## Overview:
This guide provides a walkthrough for building a centralized, multi-client testing dashboard using the Intelligems External API. By consolidating data from multiple accounts into a single interface, your agency can monitor experiment performance, track key metrics like Conversion Rate and Revenue per Visitor (RPV), and identify winning tests without the friction of constant account switching.
### Tools Used:
This guide uses the following tools:
* The Terminal: You will use the command line to initialize your project and execute deployment commands.
* Netlify: This platform will host the dashboard and manage the Serverless Functions (Node.js) used to securely fetch and process data from the Intelligems External API.
{% hint style="info" %}
Want to use your own softwares? Give Claude/Gemini/ChatGPT this article and ask how to recreate this but with X software instead so that your report uses existing company tools.
{% endhint %}
### Prerequisite
* Requires a [Netlify](https://app.netlify.com/) account (free plan available!)
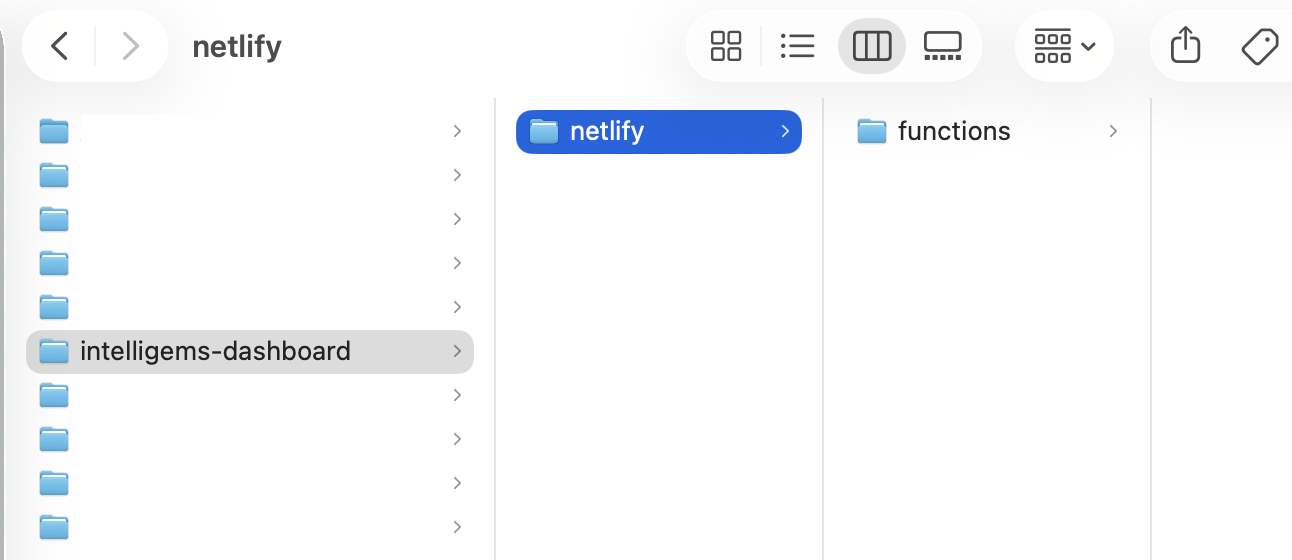
## Step 1: Create desktop folder structure
On your desktop, create a new file titled *intelligems-dashboard*.
Inside it, create the following folder structure:
## Step 2: Add an api.js file to the functions folder
If you're using a Mac, you can create an .js document by:
1. Open **TextEdit** (in your Applications folder)
2. In the top menu bar, Go to **TextEdit** → **Settings**
3. Click **"Plain Text"** (very important - NOT Rich Text)
4. Close Settings
5. Create new document: **File** → **New**
6. Paste your code (shown below!)
7. **File** → **Save As**
* Uncheck "If no extension is provided, use .txt"
* Name it: `api.js`
* Location: Navigate to `intelligems-dashboard/netlify/functions/`
* Click **Save**
Here's the code to put in your api.js file:
```
exports.handler = async (event) => {
try {
const rawKeys = process.env.INTELLIGEMS_KEYS || "[]";
const clients = JSON.parse(rawKeys);
const allResults = await Promise.all(clients.map(async (client) => {
try {
const listRes = await fetch('https://api.intelligems.io/v25-10-beta/experiences-list?status=started', {
headers: { 'intelligems-access-token': client.key }
});
const listData = await listRes.json();
const experiences = listData.experiencesList || [];
return await Promise.all(experiences.map(async (exp) => {
try {
const analyticsRes = await fetch(`https://api.intelligems.io/v25-10-beta/analytics/resource/${exp.id}`, {
headers: { 'intelligems-access-token': client.key }
});
const analyticsData = await analyticsRes.json();
const testVariant = analyticsData.variations?.find(v => v.isControl === false);
const testVariantId = testVariant?.id;
const vM = analyticsData.metrics?.find(m => m.variation_id === testVariantId) || {};
const getUpliftPct = (metric) => {
const val = metric?.uplift?.value;
return val !== undefined ? (val * 100).toFixed(2) : "0.00";
};
return {
id: exp.id,
clientName: client.name,
name: analyticsData.experienceName || exp.name || "Unnamed Test",
status: exp.status,
// Only keeping the requested columns
conversion: getUpliftPct(vM.conversion_rate),
rpv: getUpliftPct(vM.net_revenue_per_visitor),
gpv: getUpliftPct(vM.gross_profit_per_visitor),
aov: getUpliftPct(vM.net_product_revenue_per_order),
url: `https://app.intelligems.io/experiment/${exp.id}`
};
} catch (err) {
console.error(`Error fetching analytics for ${exp.id}:`, err);
return null;
}
}));
} catch (err) {
console.error(`Error fetching experience list for ${client.name}:`, err);
return [];
}
}));
const finalData = allResults.flat().filter(item => item !== null);
return {
statusCode: 200,
headers: {
"Content-Type": "application/json",
"Access-Control-Allow-Origin": "*"
},
body: JSON.stringify(finalData),
};
} catch (error) {
return {
statusCode: 500,
body: JSON.stringify({ error: error.message })
};
}
};
```
## Step 3: Add an netlify.toml file to the intelligems-dashboard folder
If you're using a Mac, you can create an .toml document by:
1. Open **TextEdit** (in your Applications folder)
2. In the top menu bar, Go to **TextEdit** → **Settings** (you should have already done this is Step 2)
1. Click **"Plain Text"** (very important - NOT Rich Text)
2. Close Settings
3. Create new document: **File** → **New**
4. Paste your code (shown below!)
5. **File** → **Save As**
* Uncheck "If no extension is provided, use .txt"
* Name it: `netlify.toml`
* Location: Navigate to `intelligems-dashboard/`
* Click **Save**
Here's the code to put in your netlify.toml file:
```
[build]
publish = "."
functions = "netlify/functions"
[functions]
node_bundler = "esbuild"
external_node_modules = ["node-fetch"]
```
## Step 4: Add an index.html file to the intelligems-dashboard folder
If you're using a Mac, you can create an .html document by:
1. Open **TextEdit** (in your Applications folder)
2. In the top menu bar, Go to **TextEdit** → **Settings** (you should have already done this is Step 2)
1. Click **"Plain Text"** (very important - NOT Rich Text)
2. Close Settings
3. Create new document: **File** → **New**
4. Paste your code (shown below!)
5. **File** → **Save As**
* Uncheck "If no extension is provided, use .txt"
* Name it: `index.html`
* Location: Navigate to `intelligems-dashboard/`
* Click **Save**
Here's the code to put in your index.html file (Callout: In the code below, update "intelligems2026" with your own desired password for this page):
```
Marketing Agency Dashboard
Client Performance Monitor
Client ↕
Test Name ↕
Conv Rate
RPV Uplift
GPV Uplift
AOV Uplift
Link
Connecting to Intelligems...
```
## Step 5: Add a package.json file to the intelligems-dashboard folder
If you're using a Mac, you can create an .html document by:
1. Open **TextEdit** (in your Applications folder)
2. In the top menu bar, Go to **TextEdit** → **Settings** (you should have already done this is Step 2)
1. Click **"Plain Text"** (very important - NOT Rich Text)
2. Close Settings
3. Create new document: **File** → **New**
4. Paste your code (shown below!)
5. **File** → **Save As**
* Uncheck "If no extension is provided, use .txt"
* Name it: `package.json`
* Location: Navigate to `intelligems-dashboard/`
* Click **Save**
Here's the code to put in your index.html file:
```
{
"name": "intelligems-dashboard",
"version": "1.0.0",
"description": "Dashboard for Intelligems test results",
"dependencies": {
"node-fetch": "^2.6.7"
}
}
```
## Step 6: Deploy to Netlify
Go to [app.netlify.com](https://app.netlify.com) and sign up (free).
Find & open the Terminal Application on your computer.

Install Netlify CLI by pasting the following code into Terminal and hitting enter:
```
npm install -g netlify-cli
```
Navigate to your project folder in terminal by pasting the following code into Terminal and hitting enter:
```
cd ~/Desktop/intelligems-dashboard
```
Login to Netlify by pasting the following code into Terminal and hitting enter (this will open your browser - click "Authorize" when it does):
```
netlify login
```
Deploy to your site by pasting the following code into Terminal and hitting enter:
```
netlify deploy
```
In terminal, you'll be prompted with a few questions. Answer them the following way (navigate with arrow keys & hit enter to select the highlighted answer):
* Choose to "Create & configure a new project"
* Choose your team
* Write in a site name like "YOURCOMPANY-intelligems-dashboard"
Now deploy this to production by pasting the below code into your Terminal and pressing enter:
```
netlify deploy --prod
```
## Step 7: Add your API keys
In your browser, go to your [Netlify dashboard](https://app.netlify.com/).
Click on your YOURCOMPANY-intelligems-dashboard project.
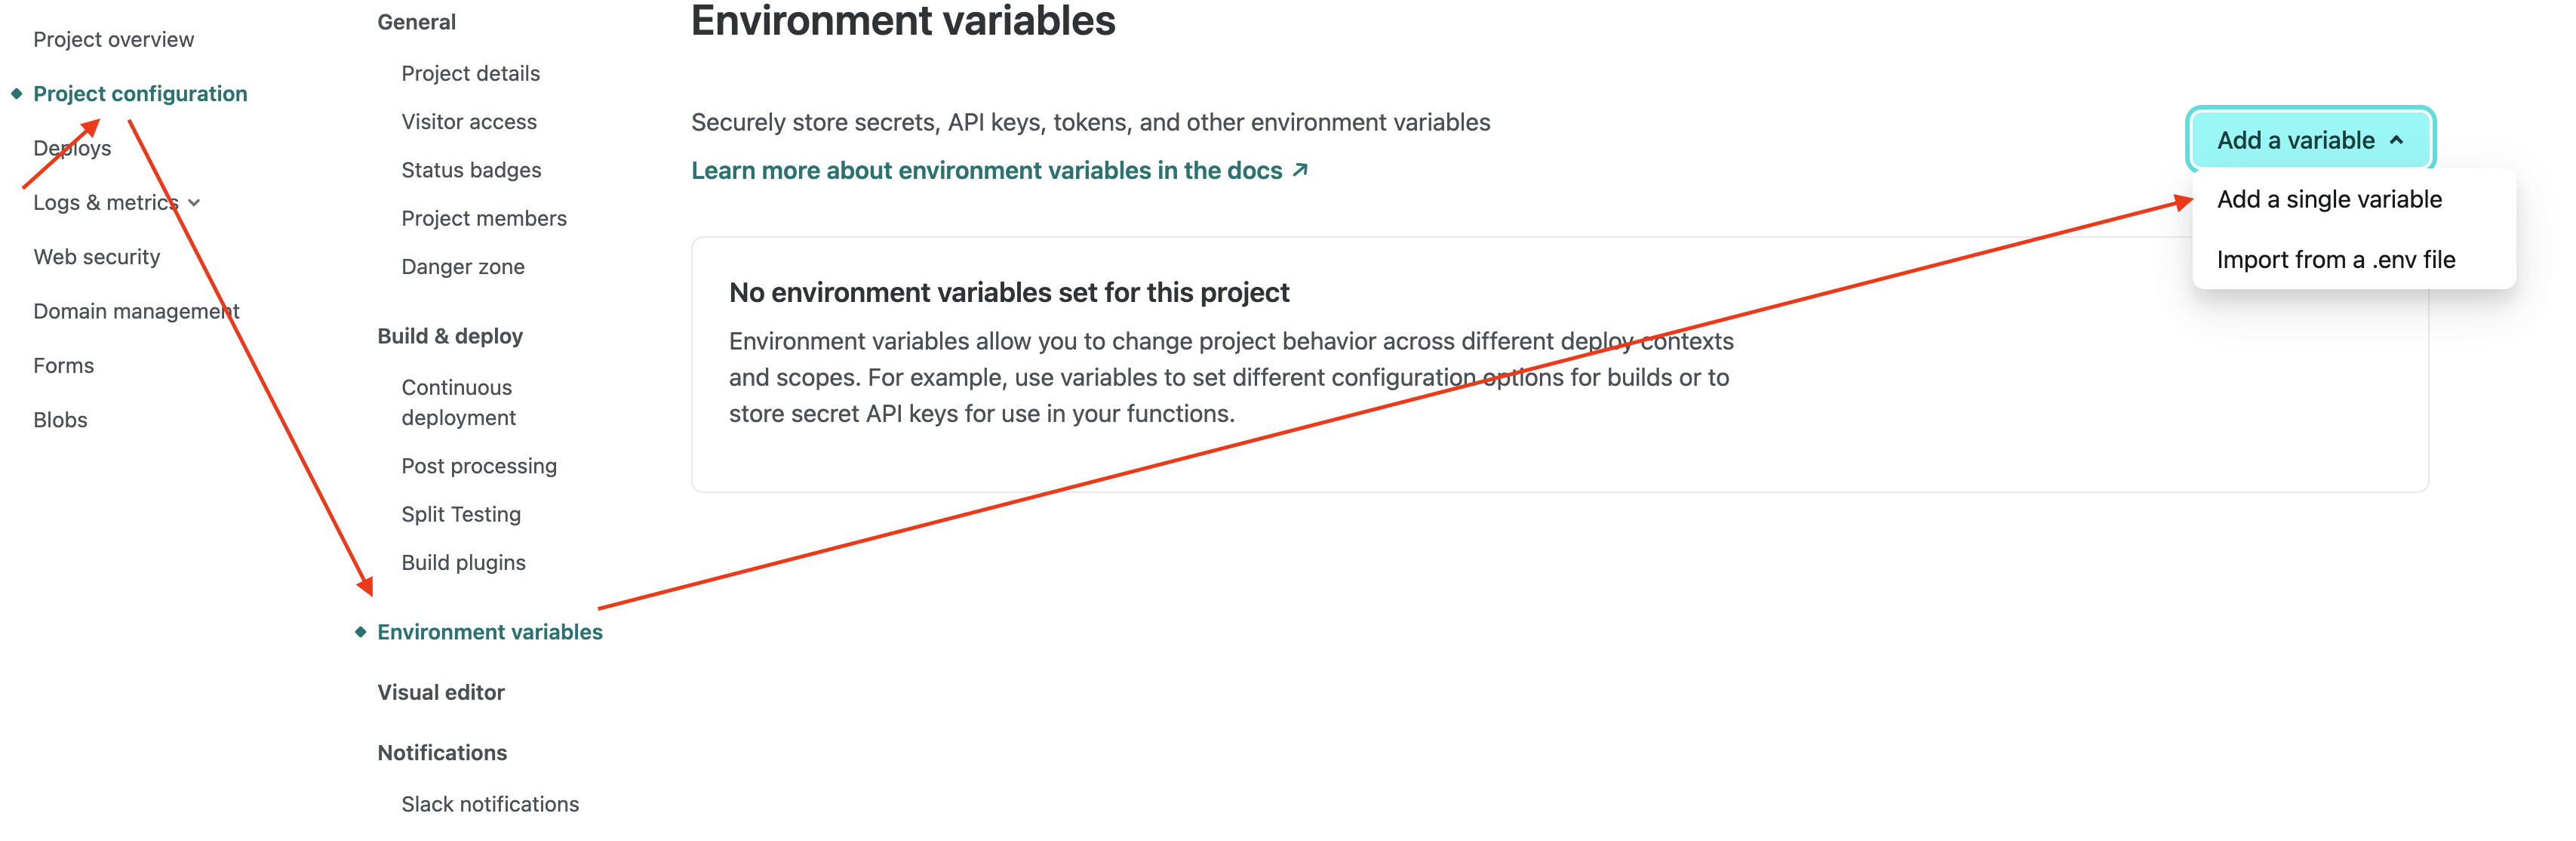
Navigate to project configuration > Environment variables > Add a variable > Add a single variable
Set the key value to INTELLIGEMS\_KEYS*.*
Set the value to your Intelligems API Key(s). \[[How to get Intelligems API Key](https://docs.intelligems.io/developer-resources/external-api#getting-started)] Follow this format:
```
[{"name":"Client One", "key":"ig_live_1111"}, {"name":"Client Two", "key":"ig_live_2222"}]
```
Replace "Client One" with yourself or if you're an agency, replace this with the name of the client associated with the API Key.
Select Create Variable.
Redeploy by pasting the below code into Terminal and hitting enter:
```
netlify deploy --prod
```
## Step 8: Visit your dashboard
In terminal, it will display your production URL. It'll be formatting like
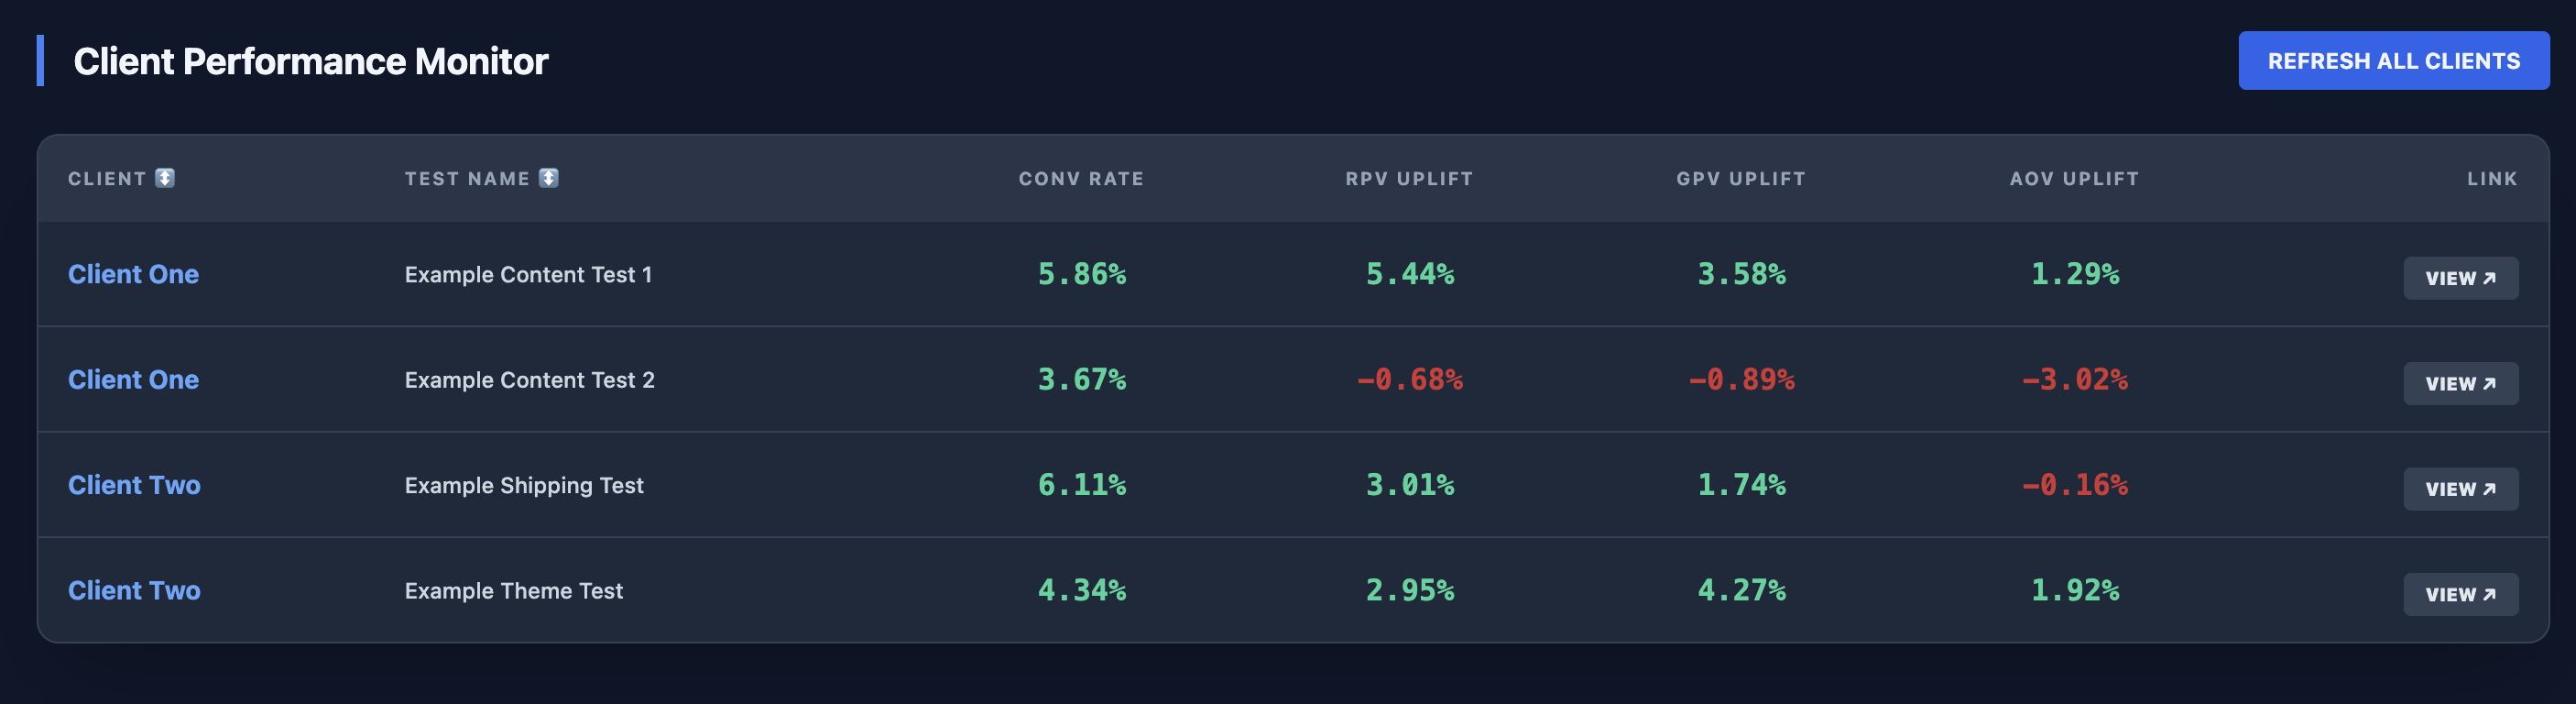
When you visit this URL, it'll prompt you for a password (unless you changed it in the code above it'll be intelligems2026). Once you enter your password, you'll see your new Multi-Client Dashboard!:
## Bonus: Enhancements
You can customize this dashboard with specific metrics you are looking for! Here are a few ideas of metrics you can include & their mapping for the API:
* Total visitors per variant
* API: GET `/v25-10-beta/analytics/resource/{experienceId}`
* Metric: `metrics[].n_visitors.value` (where `variation_id == [ID]`)
* Total orders per variant
* API: GET `/v25-10-beta/analytics/resource/{experienceId}`
* Metric: `metrics[].n_orders.value` (where `variation_id == [ID]`)
* Total revenue per variant
* API: GET `/v25-10-beta/analytics/resource/{experienceId}`
* Metric: `metrics[].net_revenue.value` (where `variation_id == [ID]`)
* Launch date
* API: GET `/v25-10-beta/experiences-list`
* Metrics: `experiencesList[0].startedAtTs`
* Total tests launched within the last 30 days
* API: GET `/v25-10-beta/experiences-list`
* Metric: Filter the `experiencesList` for objects where `startedAtTs` is less than or equal to 30 days ago.
* List of tests in draft
* API: GET `/v25-10-beta/experiences-list`
* Metric: use `experiencesList[].status` (where the status is `pending`)
---
# Agent Instructions
This documentation is published with GitBook. GitBook is the documentation platform designed so that both humans and AI agents can read, navigate, and reason over technical content effectively. Learn more at gitbook.com.
## Querying This Documentation
If you need additional information that is not directly available in this page, you can query the documentation by asking a question.
Perform an HTTP GET request on the following URL with the `ask` and `goal` query parameters:
```
GET https://docs.intelligems.io/developer-resources/external-api/automations-and-guides/build-a-multi-client-test-overview-dashboard.md?ask=&goal=
```
`ask` is the immediate question: it should be specific, self-contained, and written in natural language.
`goal` is what the user is ultimately trying to achieve, the reason they need the answer. Sharing it helps GitBook give you a better, more relevant answer. A goal is most helpful when it describes the outcome the user wants rather than restating the question. For example, with `ask=how do I create an API token`, a goal like `automate deployments from our CI pipeline` lets GitBook tailor the answer to that use case.
The response will contain a direct answer to the question and relevant excerpts and sources from the documentation.
Use this mechanism when the answer is not explicitly present in the current page, you need clarification or additional context, or you want to retrieve related documentation sections.