> For the complete documentation index, see [llms.txt](https://docs.intelligems.io/llms.txt). Markdown versions of documentation pages are available by appending `.md` to page URLs; this page is available as [Markdown](https://docs.intelligems.io/pricing-experiences/pricing-experiences-overview/how-to-set-up-a-price-test.md).
# How to Set Up a Price Change Experience
Check out the steps below to learn how to set up a price test!
A Price Change updates the price and compare-at price shown on your PDPs and across your site for the products you select. You can run it as a Test to see which price performs better, or as a Personalization to show a chosen price to everyone or to a specific audience.
{% hint style="warning" %}
Before you build, make sure the integration is complete. Pricing needs the Intelligems team to tag your product prices before it can change them on the frontend. See Price Testing Integration Guides.
{% endhint %}
## Step 1: Create the experience and pick a mode
In the left nav, go to **Pricing** and click **New Pricing Experience**.
On the type modal, select **Price Change**. Then on **How do you want to run this experience?**, choose:
* **Run a Test** — visitors are split between groups and the results tell you which price performs better.
* **Create a Personalization** — the price you pick is shown to everyone, or to a specific audience, with nothing being tested.
{% hint style="info" %}
Not sure? Start with a Test. You can roll the winner out to everyone or to a specific audience once you have results. See Rolling Out a Winner.
{% endhint %}
{% hint style="warning" %}
Three things work differently when you run a Price Change as a Personalization:
* You can only reduce prices.
* Duplicate products and subscription products aren't supported.
* Prices change in your store's default currency only. We switch currency targeting on automatically and set it to that currency, so shoppers browsing in another currency won't see the Personalization.
{% endhint %}
## Step 2: Set up your groups
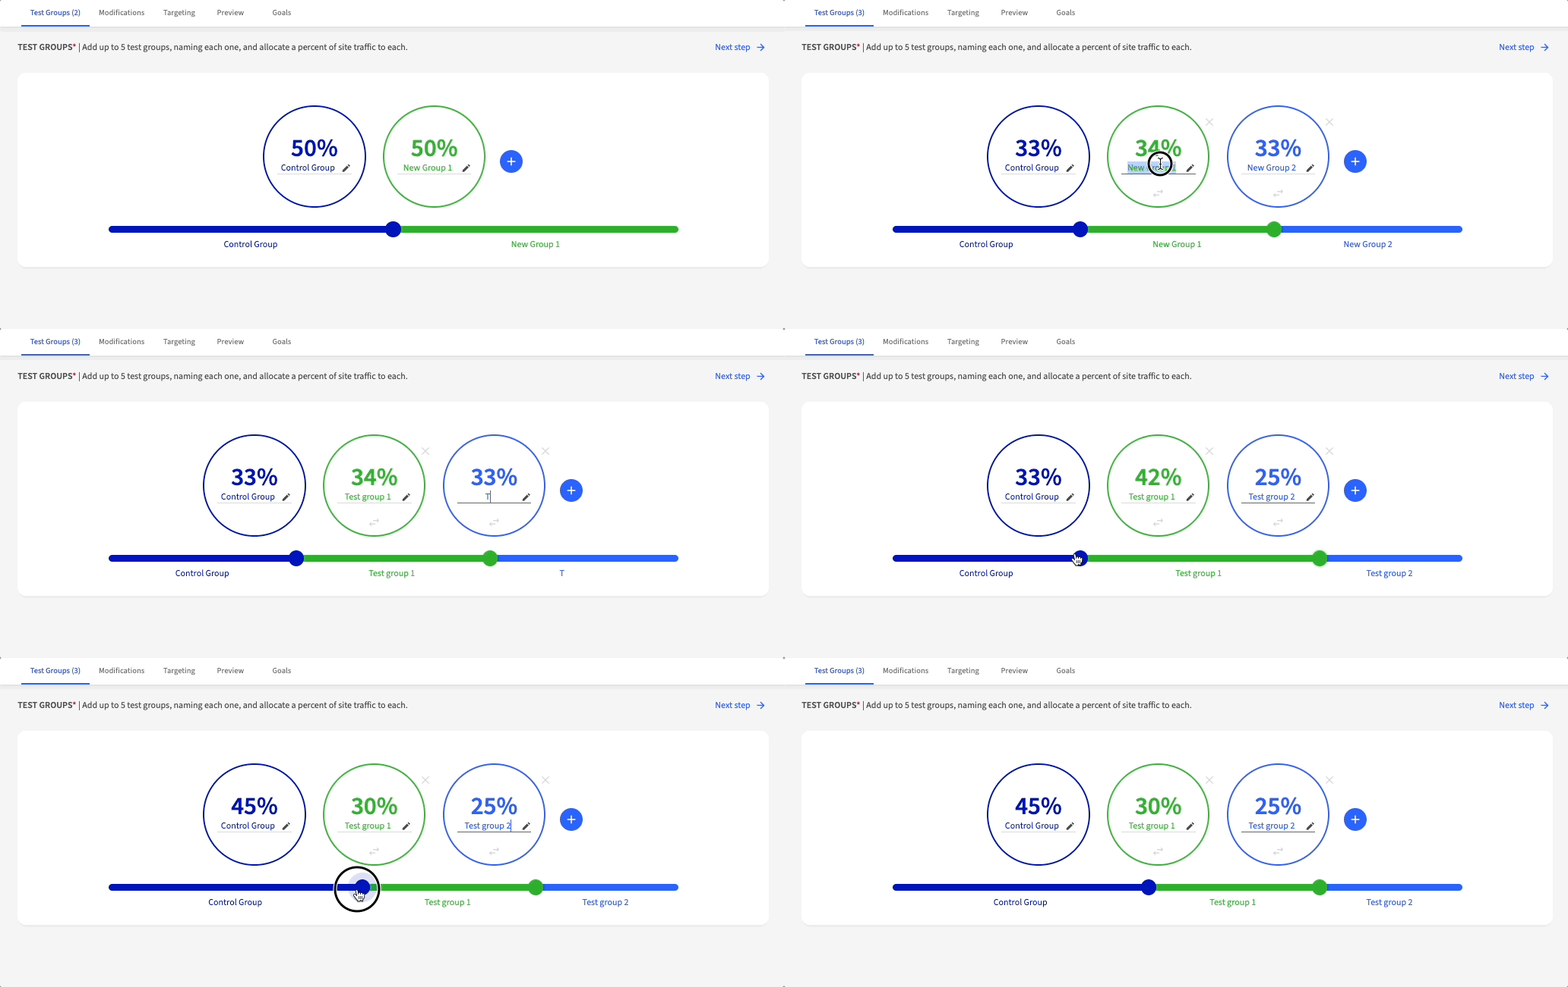
**If you're running a Test**, open the **Test Groups** tab. Create 2–5 groups by clicking **+**. Name each group and use the slider to allocate traffic percentage. Click **Next step** when ready.
{% hint style="info" %}
The more groups you have, the longer it will take to reach statistically significant results. You'll need about 300 orders in each group to detect a 10% change in conversion with 90% confidence.
{% endhint %}
**If you're running a Personalization**, skip this step. A Personalization has one group and needs no traffic split.
{% hint style="info" %}
The more groups you have, the longer it will take to get statistically significant results. You’ll need about 300 orders for each group in the test to detect a 10% change in conversion with 90% confidence.
{% endhint %}
## Step 3: Choose your products
On the **Modifications** tab, click **+ Add / Remove Products** in the Price card and select which products to include by checking the boxes on the left.
A few tips and tricks:
* You can select every product in your store, or every product matching the filters you have set, by clicking the checkbox at the top left of the table.
* Use the search bar at the top of the table to find a specific product.
* Use the filter dropdowns on the left to narrow by Product Type, Vendor, Tags, Status, or Collections.
{% hint style="info" %}
If you have 250+ Product Types, Vendors, or Tags in Shopify, Shopify won't let us load them all. Use the Intelligems search bar with the same syntax Shopify uses: `tag:Test`, `product_type:Test`, `vendor:Test`. Reach out to Intelligems support if you get stuck.
{% endhint %}
When your selection is complete, click **Add** at the bottom right of the modal.
## Step 4: Set the test prices
There are three different options for filling in your prices:
Uploading a Spreadsheet
This is best suited for cases where you have already set up your prices in a CSV or Excel file.
Click **Quick Fill**, then **Fill By Upload**, then **Download Template**. The template contains your selected products and the columns Intelligems needs.
Using Microsoft Excel, Google Sheets, Numbers, or another spreadsheet editing tool, manually input the prices for the test groups and save the file with a .csv, .xls or .xlsx extension.
The following fields (columns) are **required** in the uploaded file.
* product\_title
* product\_id
* variant\_title
* variant\_id
* handle
* Price - \[Test Group Name] (*for each test group*)
* Compare Price - \[Test Group Name] (*for each test group*)
The rest of the fields in the template are provided for reference and are not required.
\
Back in the Intelligems app, click the 'Upload Prices' button and select the saved .csv, .xls or .xlsx file. Once it has uploaded, save the test to see the price changes.
Quick Fill
Use this to apply a uniform change to every selected product — for example, +10% or -$5 across the board. Quick Fill works off the control-group prices pulled in from Shopify.
Click **Quick Fill**, then **Fill By Formula**. For each group, set:
* Increase or Decrease
* The amount
* % or $
* Rounding *(Don't Round by default)*
* Decimals
Click **Apply All** when done.
Manually Set Prices
Use this when prices vary per product — for example, $10 off Product A and $5 off Product B.
Type the price and, optionally, the compare-at price for each product and group. You can drag a value from one cell to the next to copy it.
Use **Expand All** and **Collapse All** at the top left of the table to control the view.
Input the prices and 'compare at' prices (if desired) for each product and test group in the table. You can drag prices from one cell to the next if the prices are the same.
You can expand all rows or collapse all rows by pressing 'Expand All' or 'Collapse All' at the top left of the table.
{% hint style="info" %}
There are two relevant fields for each entry:
* Price: The price of the product; this is the price the user will actually be charged when they purchase the product in the given test group, before any discounts.
* Compare Price: Also known as the 'compare at price', this price will be shown as a strikethrough. This field is optional and there is no need to populate the 'Compare Price Field' if you do not wish to show a strikethrough. Your theme must be configured to show strikethroughs in order for Intelligems to display one.
{% endhint %}
{% hint style="warning" %}
You can't save the experience until every group has a price for every selected variant. If you try, you'll see "Price is not properly configured." Fill in the missing rows and save again.
{% endhint %}
Click 'Next step' when you are done setting up your prices.
## Step 5: Set up targeting if needed
Targeting is optional. By default, a visitor is assigned to a group on first visit and stays in that group via a first-party cookie for the duration of the experience.
The **Common** tab covers:
* **Device Type** — All Devices, Desktop, or Mobile.
* **Visitor Type** — All Visitors, New, or Returning.
* **Source Sites** — Direct, Email, Referral, Affiliate, Organic Social, Paid Social, Organic Search, Paid Search, Paid Shopping, SMS, Google, Facebook, Instagram, TikTok, Twitter, YouTube.
* **Countries** — one or more.
The targeting tool allows you to apply specific conditions to certain site visitors. There are a few different ways you can do this:
* You can use UTM parameters to customize your user experience under the Audience option.
* You can filter traffic based on JavaScript Expressions under the Audience option.
* You can prevent users from being targeted by related experiments to reduce undesired interactions under the [Mutually Exclusive Tests](/general-features/targeting/mutually-exclusive-experiments.md) option.
A **Currency** section sits below Audience. Price Changes are limited to a single currency and default to your store's currency. Filtering by currency needs Shopify Markets or a supported localization app.
You can learn more about targeting [here](/general-features/targeting.md)! When you're done, click **Next step**.
## **Step 6: Configure Analytics**
On the **Configure Analytics** tab, choose your Key Metrics and Primary Metric. Intelligems records 20+ metrics on every experience — pick up to seven Key Metrics to show on the front page of your results.
**Revenue per Visitor** is the default Primary Metric. You can change it by clicking **Primary** on any Key Metric. Visitors, Orders, and Revenue are shown on every experience by default.
You can add more Key Metrics later, and you can still access every recorded metric even if it isn't in your Key Metrics list.
Click **Next step** when you're done.
## **Step 7: Save and Preview**
Once you have completed all the steps, you'll be able to save your test with the green **Save** button in the top right.
In the **Preview** tab, you'll find a few options to load the test's preview:
* **Open Full Screen Preview:** this will open your website with the Intelligems widget loaded, so you can easily alternate between test groups to preview each group's experience, as well as do onsite edits if necessary (see [step 8](#step-8-edit-content-on-your-site-if-needed) for more details). You can also choose which theme you'd like to preview in if you need to be somewhere other than your live theme!
* **Open Mobile Preview:** you'll see a QR code for each test group, so you can load the preview directly on your mobile device.
* **Copy Preview URL:** this will copy the preview URL to your clipboard automatically.
{% hint style="danger" %}
Don’t worry, this won’t set the test live yet and you can come back and edit if you need to make changes!
{% endhint %}
## Step 8 (optional): Edit content on your site if needed
This step is also optional. This tool allows you to dynamically update content on your site based on a visitor's test group. Check out [this article](/general-features/editors/visual-builder.md) for more details on configuring this option.
Please note this is not how you should update price components on your site for a Price Test - that should be completed by [tagging your prices](/pricing-experiences/price-testing-integration-guides/integration-guide-using-shopify-functions/step-2-tag-product-prices.md)!
## What happens next?
Now that you've created your pricing test, you can QA your test using [this checklist](/pricing-experiences/price-test-qa-checklist.md)! If you have not completed the integration yet, please see our integration guides [here](/pricing-experiences/price-testing-integration-guides.md).
---
# Agent Instructions
This documentation is published with GitBook. GitBook is the documentation platform designed so that both humans and AI agents can read, navigate, and reason over technical content effectively. Learn more at gitbook.com.
## Querying This Documentation
If you need additional information that is not directly available in this page, you can query the documentation by asking a question.
Perform an HTTP GET request on the following URL with the `ask` and `goal` query parameters:
```
GET https://docs.intelligems.io/pricing-experiences/pricing-experiences-overview/how-to-set-up-a-price-test.md?ask=&goal=
```
`ask` is the immediate question: it should be specific, self-contained, and written in natural language.
`goal` is what the user is ultimately trying to achieve, the reason they need the answer. Sharing it helps GitBook give you a better, more relevant answer. A goal is most helpful when it describes the outcome the user wants rather than restating the question. For example, with `ask=how do I create an API token`, a goal like `automate deployments from our CI pipeline` lets GitBook tailor the answer to that use case.
The response will contain a direct answer to the question and relevant excerpts and sources from the documentation.
Use this mechanism when the answer is not explicitly present in the current page, you need clarification or additional context, or you want to retrieve related documentation sections.