How to Set Up a Shipping Test
This guide will walk you through the steps to set up a shipping test in Intelligems.
Running a Pricing experience at the same time? If your price integration uses Shopify Functions with the Expand operation, no test shipping rates will be served at checkout. The Expand function discards the cart line item property that carries the shopper's group, and that property is how Intelligems decides which rate to serve. Functions with the Update operation and Duplicate Products both work as expected. Check Settings > Plugin configurations for your price testing integration mode and Settings > Manage Functions for your operation. If you're on Expand, contact support before you build.
Step 1: Create your experience
Go to Shipping in the left menu and click New Shipping Experience. On the Shipping tab, choose the Shipping Rates card.
Enter a Name and Description. This information is internal only. Add enough detail so you'll remember your goals when reviewing results weeks later.
Only one Shipping Rates experience can exist at a time, including one you've created but haven't started. Intelligems installs the carrier rate on your Shopify profile as soon as the experience is created, so a second one in a pending or running state causes conflicts. End any that are running and delete any that are pending before you build a new one.
Free Shipping experiences aren't affected by this limit.

Step 2: Create your test groups
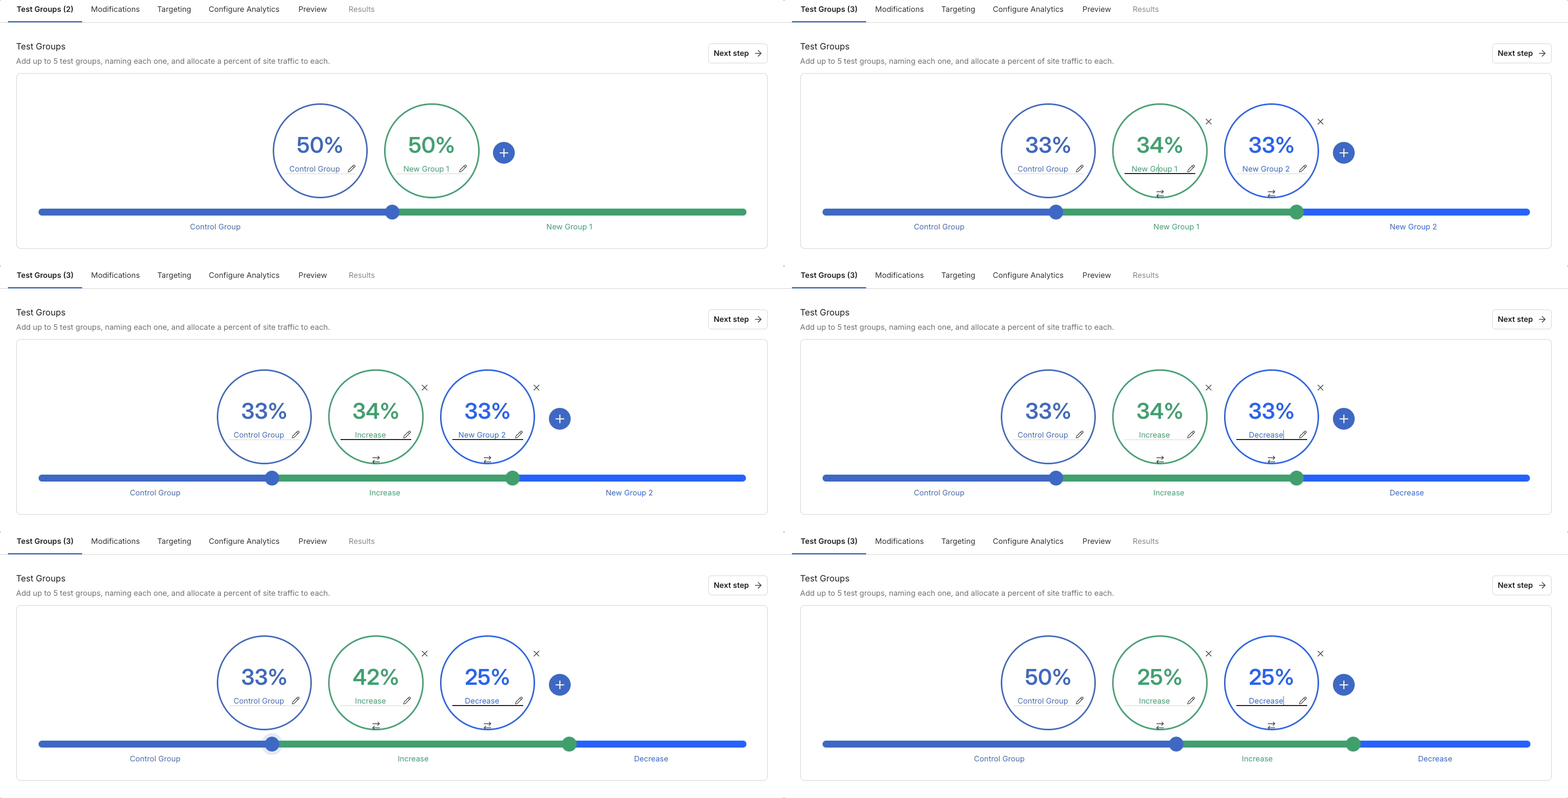
Create 2-5 groups by clicking +. Name each group and use the slider to allocate traffic percentage. Click Next step when ready.

Step 3: Select shipping profiles and zones to test
Using the expander for each shipping profile, select the zone(s) where the Intelligems rate will be added. The Intelligems rate will only apply to the profiles and zones selected here and will apply to all orders that meet the criteria for the selected profiles and zones, subject to other cart value and weight criteria which you'll configure in the next step.

Consider carefully which profile(s) you add the Intelligems rate to. If your store's products are spread across multiple profiles, adding the Intelligems rate to a subset of profiles may lead to unexpected behavior at checkout. Learn more about how Shopify combines rates here.
Shipping from multiple locations? If an order is fulfilled from more than one of your locations, the Intelligems test rate is applied once per fulfillment location and Shopify combines these into a single total at checkout (e.g. a $10 test rate becomes $20 for a two-location order).
This differs from native Shopify flat rates, which can be charged only once per order for locations within the same location group. Because Intelligems serves test rates through Shopify's third-party carrier-calculated rate API, Shopify applies a combined rate rather than a single flat rate — this is a Shopify limitation that applies to all weight-based, carrier-calculated, and app rates.
If your store ships orders from multiple locations, expect shipping charges to add up for split-fulfillment orders during a test. The only way to avoid this is to have the affected items ship from a single location.
Step 4: Select the rates you want to replace for this test
Once you have selected the profiles and zones you want Intelligems rates to apply to, you will select which rates from those zones you want to test. These rates will be hidden during the test and replaced by an Intelligems rate, which will vary by test group.

Step 5: Configure the Intelligems rate(s)
In this step, you will configure the rate(s) to be added to the previously selected profiles and zones for each test group.

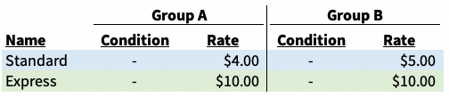
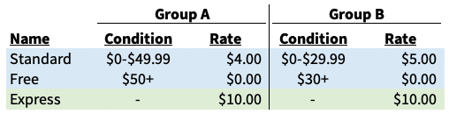
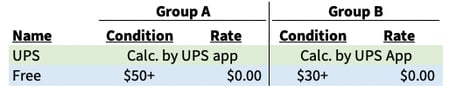
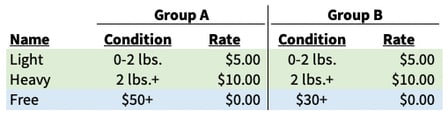
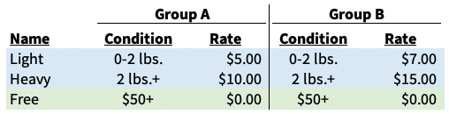
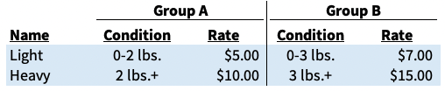
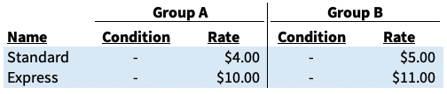
For each group, choose the rate type that most closely aligns with what you're testing (i.e. what you want to change in each test group). See below for some tips on when to select each rate type and examples of combined rates:
Different Rate Types

Flat Rate: You are testing rate(s) that are not set up with conditions in Shopify ("flat rates")


Flat Rate with Threshold: You are testing a flat rate and the threshold for free shipping

Threshold Only: You are testing a free shipping threshold but want to keep your existing rates for those that do not reach the threshold


Tiered by Price or Weight:


Custom: Have something else you want to test?
Let us know and we'll see what we can do!
Step 6: Review your rates
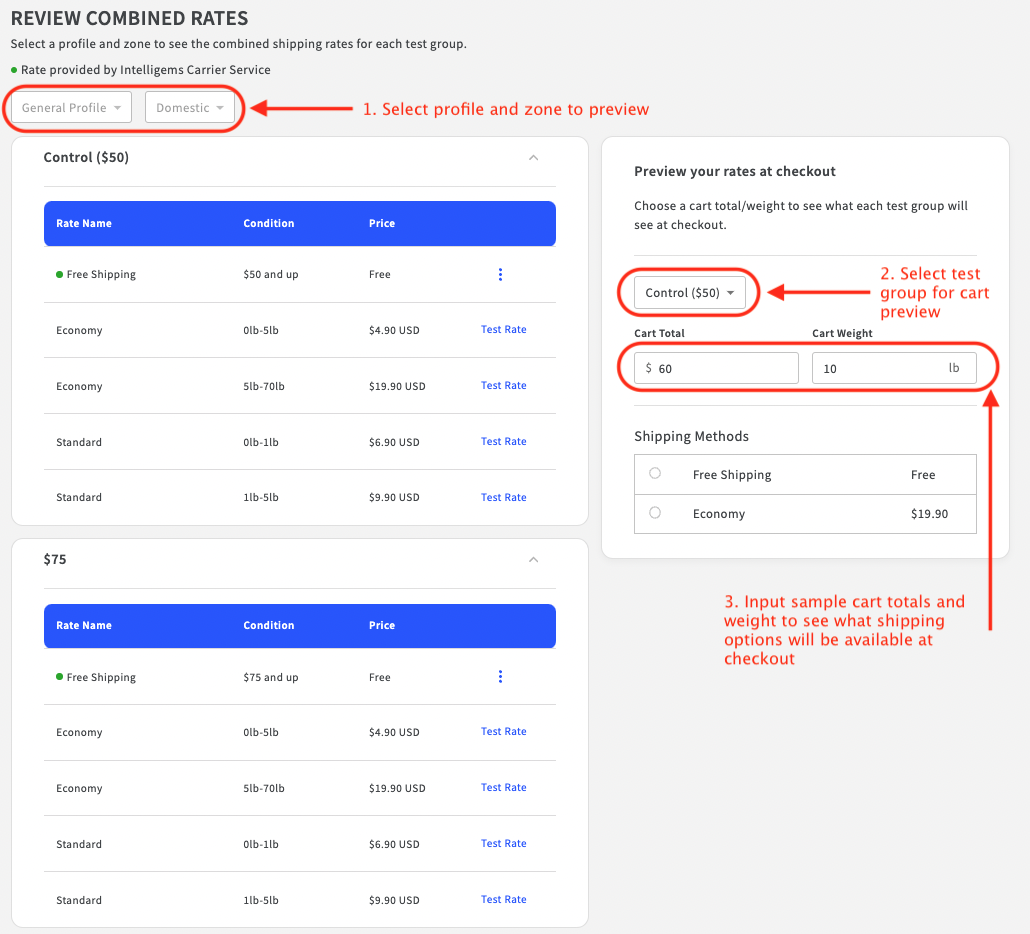
Use the drop-downs to review profiles, zones, and test groups.
Select profile and zone to preview
Select test group for cart preview
Input sample cart totals and weight to see what shipping options will be available at checkout
Rates displayed at checkout during the test may differ from preview if order products are included in multiple shipping profiles.

Step 7: Enable & customize your progress bar if needed
If you currently show a shipping progress bar on your site or if you would like to include one for your test and you are testing shipping thresholds, it is recommended to use the built-in option from Intelligems found in the Global Styles components so that the bar will update with the test group. Adding the Intelligems progress bar typically requires adding a component to your theme's liquid code and customizing the bar's style in the Intelligems app.
Learn more about adding the Intelligems shipping progress bar and other components here.
See below for a few examples of a configured shipping progress bar during a live test.


Example 1: Under the Free Shipping Threshold
Example 2: Exceeded the Free Shipping Threshold
Example 3: Under the Cart Minimum Threshold
Step 8: Edit content on your site if needed
This step is also optional. This tool allows you to dynamically update content on your site based on a visitor's test group. Check out this article for more details on configuring this option.
Step 9: Set up targeting if needed
Targeting is an optional step. By default, a visitor will be immediately assigned to one of the test groups using its random split-test mechanism. This assignment is determined at the first visit and is stored via a first‐party cookie, ensuring that the visitor remains in the same group on subsequent visits during the shipping test period.
The targeting tool allows you to apply specific conditions to certain site visitors. There are a few different ways you can do this:
You can set up currency and country targeting that allows you to limit your test to a single currency and/or a list of specific countries. This feature is defaulted to your store currency for price test.
You can use UTM parameters to customize your user experience under the Audience option.
You can filter traffic based on JavaScript Expressions under the Audience option.
You can filter traffic based on device type (i.e. mobile or desktop) under the Audience option.
You can filter traffic based off of whether a visitor is new or returning under the Audience option.
You can prevent users from being targeted by related experiments to reduce undesired interactions under the Mutually Exclusive Tests option.
You can learn more about targeting here!
Step 10: Save and preview your test
Once you have completed all the steps, you'll be able to save your test with the green Save button in the top right.
In the Preview tab, you'll find a few options to load the test's preview:
Open Full Screen Preview: this will open your website with the Intelligems widget loaded, so you can easily alternate between test groups to preview each group's experience, as well as do onsite edits if necessary (see Step 8 for more details). You can also choose which theme you'd like to preview in if you need to be somewhere other than your live theme!
Open Mobile Preview: you'll see a QR code for each test group, so you can load the preview directly on your mobile device.
Copy Preview URL: this will copy the preview URL to your clipboard automatically.
Once the test is saved, you should be able to see Intelligems as a rate carrier in your Shopify shipping settings for each profile and zone you selected in step 2. If you do not see it there automatically, you may need to click 'Add rate' and select it from the carrier options.
What happens next?
Now that you've created your shipping test, you can QA your test using this checklist!
Last updated
Was this helpful?